One of my friends asks from me that have you tried on ReactJS on legacy MVC application that I never tried before. So I googled it and found a few blog posts and I followed up this post
It is kinda cool to try something like that and I will write almost all the things in here with my words. (Maybe someone will follow up this post)
So if you are trying this, first you need to create a package.json file in the root of your MVC application. To do that execute the below command in your root folder.
npm init -yThis will create a package.json file with default settings.
Then you need to add webpack and webpack-cli as the dev dependencies. Webpack will bundle your ReactJS code.
To do that you need to execute the following command.
npm install --save-dev webpack webpack-cliThen you need to add react and react dom to project. To do that execute the following command.
npm install react react-dom --save-devWith that, you can use all the goodies from ReactJS.
Then you need to add babel. Babel will transpile your JSX code into JS.
Execute below code to add babel.
npm install @babel/core @babel/preset-react babel-loader --save-devNow all the setup is ready and let’s dive into coding.
We are going to have our ReactJS components inside the Scripts folder. Create a folder called src and add index.js file.
Then we can add below code for the starting point of the application.
import React from ‘react’;
import ReactDOM from ‘react-dom’;
const App = () => <div>Hello world!</div>;
ReactDOM.render(<App />, document.getElementById(“root”));
Then we are going to add the webpack configuration file. Create a folder called config under Scripts folder and add a file named webpack.config.js
Then add this code below.
const path = require("path");

module.exports = {
    entry: {
        index: "./Scripts/src/index.js"
    },
    output: {
        path: path.resolve(__dirname, "../dist"),
        filename: "[name].js"
    },
    module: {
        rules: [
            {
                use: {
                    loader: "babel-loader"
                },
                test: /\.js$/,
                exclude: /node_modules/
            }
        ]
    }
}
Now we are setting up the babel. In here we are telling to babel that uses react preset to transpile the code. To do that we need to add .babelrcfile in the root of the project and add the below code to that file.
{
    "presets": [
      "@babel/preset-react"
    ],
    "plugins": [
    ]
}
Okay, all the things are done and we need to build the project. So, we can add the build command to package.json file’s scripts section.
 ...
 "scripts": {
    "test": "echo \"Error: no test specified\" && exit 1",
    "build": "webpack --config=Scripts/config/webpack.config.js"
  }
...
Then we can build the React App.
npm run buildAlright, if all the things happen correctly you will see dist
folder and index.js file inside of it.
Now we need to add below code in toindex.cshtml file inside the Home folder.
<div id="root"></div>
@Scripts.Render("~/Scripts/dist/index.js")
Hola… all done now and run the ASP.net MVC application and you will then see the content that we added from ReactJS app.
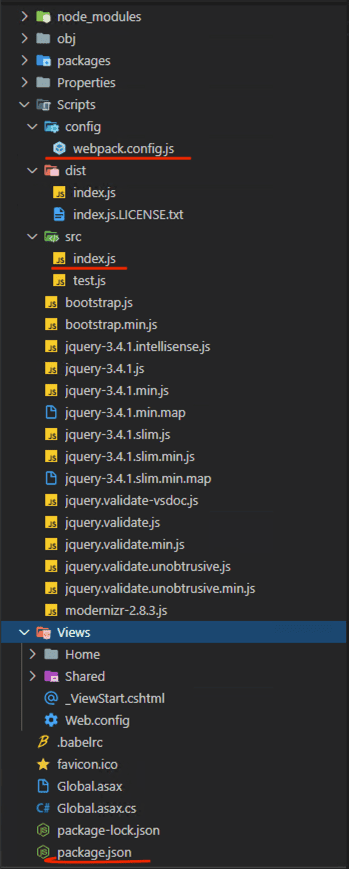
You can see my root folder structure from blow image.
I also highly encourage you to go and check the original post that I learn this cool thing.
Main image credit.

